A great griddle is the backbone of quick, consistent breakfasts and steaks that keep guests happy. When commercial griddle installation is done right, you get safer operation, steadier temps, and fewer last-minute headaches. According to the U.S. Fire Administration, cooking equipment is the leading cause of nonresidential kitchen fires, so getting the setup right is not optional.
According to NFPA 96, most local codes lean on its ventilation and fire protection standards, so double-check hood capture and make-up air. According to the ASHRAE Handbook on HVAC Applications, poor makeup air balance can negatively impact performance and draw combustion products into the kitchen. With this commercial griddle installation checklist, you can move through inspections more efficiently, minimize downtime, and protect your investment.
Key Takeaways
- Measure installation space and verify electrical specifications, including voltage, amperage, and dedicated circuit requirements.
- Confirm gas line BTU capacity, install shutoff valves, and test all connections for leaks.
- Ensure the hood system’s capacity matches the griddle’s heat output, and fire suppression coverage aligns properly.
- Inspect equipment upon delivery, position grease collection systems, and test all drainage components.
- Calibrate temperature controls at multiple points and complete proper griddle seasoning before operation.
1. Pre-Installation Site Assessment and Measurements
A thorough pre-installation site assessment saves time and money by preventing last-minute changes. It confirms the space fits the unit, the utilities are ready, and the ventilation path is clear, so the crew can install in one trip and keep your opening timeline intact.
This step also boosts long-term reliability. By planning your commercial griddle installation around accurate measurements and verified connections, you reduce wear on components, improve heat consistency, and protect food quality. In addition, a well-documented commercial griddle installation helps you pass inspections smoothly and supports warranty compliance.
2. Electrical Requirements and Power Supply Verification
Getting the electrical right is nonnegotiable for safety, uptime, and performance. Many commercial griddles draw 8 to 20 kW, which can require dedicated 40- to 80-amp circuits at the correct voltage and phase. Undersized wiring or breakers lead to nuisance trips, overheated conductors, and premature component failure.
According to the U.S. Fire Administration, electrical malfunctions are a leading cause of nonresidential building fires. Verifying loads, panel capacity, breaker type, receptacle configuration, and grounding in advance cuts the risk of failed inspections and costly rework.
This is where a commercial griddle installation checklist keeps you on track. By documenting nameplate ratings, matching plug and receptacle types, confirming GFCI or AFCI requirements where applicable, and testing voltage under load, you ensure stable heat recovery and consistent cooking results. Likewise, using a commercial griddle installation checklist to schedule a licensed electrician for any upgrades helps you avoid downtime on delivery day and protects warranty coverage.
3. Gas Line Connection and Safety Protocols
A correct gas hookup keeps your griddle hot, safe, and code-compliant. If the pressure, line size, or fittings are incorrect, you may experience weak heat, burner issues, or dangerous leaks. Simple steps to follow:
- Verify that the fuel type and pressure match the nameplate specifications. Natural gas typically requires 7 to 10 inches of water column, while propane usually requires 11 to 14 inches.
- Ensure the gas line is sized to accommodate the total BTUs and the length of the run, so the burners are not starved.
- Install an easy-to-reach shutoff valve and a listed flexible connector sized for the unit’s BTU load.
- If the manufacturer specifies a regulator, install it in the correct direction and leave sufficient space around its vent.
- Test every joint with a noncorrosive leak solution. Do not use a flame to check for leaks.
- Maintain proper clearances from combustibles and ensure the hood captures flue gases.
- If the unit is on casters, add a quick disconnect and a restraint cable to protect the line.
A simple commercial griddle installation checklist helps you confirm each of these items before using the griddle for the first time.
4. Ventilation System Compatibility Check
 Verifying that your hood and make-up air are matched to the griddle’s output is critical for safety, code compliance, and steady cooking. If capture and airflow are inadequate, the negative pressure can disturb burner flames or pull combustion products back into the kitchen.
However, when the ventilation system is appropriately sized and balanced, the griddle maintains set temperatures more reliably and recovers more quickly during peak periods. This way, food quality stays consistent throughout the service. The kitchen runs more calmly and clearly, staff stay more comfortable, filters last longer, and maintenance costs decrease. Use a commercial griddle installation checklist to document measurements, note any necessary corrections, and schedule any required service before the first cook.
5. Floor Preparation and Structural Support
Your griddle requires a flat, solid base to perform its job effectively. If the floor is uneven or soft, grease will pool, pans can slide, and you will see hot spots. A sturdy surface also prevents cracked tile, loose grout, and the kind of vibration that wears out parts prematurely.
Choose slip-resistant, grease-resistant flooring and ensure that spills can be easily mopped or drained without collecting under the unit. Level the griddle with its legs or casters, add any required restraints, and keep clear access to shutoff valves. Jot down these checks in your commercial griddle installation checklist so the team sets it up correctly the first time.
6. Equipment Delivery and Inspection Process
Catching shipping damage or missing parts at the door lets you note it on the delivery receipt, which is often required for claims. A careful check against the purchase order ensures you received the correct model, voltage, or gas type, and all accessories, so you do not discover a wrong plug, missing regulator, or absent legs on installation day.
A thorough visual inspection prevents unsafe startups and costly rework. Finding bent frames, dented plates, damaged controls, or compromised gas and electrical inlets before you wheel the unit into place avoids failed inspections and downtime. Recording photos, serial numbers, and findings in your commercial griddle installation checklist also creates a clear paper trail that speeds vendor support and warranty approvals.
7. Positioning and Leveling the Commercial Griddle
Getting placement and level right protects safety, speed, and food quality. Proper positioning keeps cooks out of hot traffic lanes, ensures clear access to shutoffs and the grease drawer, and places the plate fully under the hood, capturing smoke and grease. The correct clearances prevent heat damage to nearby surfaces and reduce fire risk, which helps with inspections and insurance requirements.
A level plate prevents grease from pooling, stops food from sliding, and ensures even heat distribution across the surface. That means better sears, fewer flare-ups, and faster ticket times. Locking the level in place also cuts wear on components and lowers cleanup time, since grease flows where it should instead of spilling onto the floor.
8. Utility Connections and Testing Procedures
According to the U.S. Fire Administration, electrical problems are a significant cause of nonresidential fires each year. Therefore, checking voltage, phase, grounding, gas pressure, and regulator direction before turning the unit on is essential.
Perform a pressure test and a soap-and-water leak check on every gas joint, then verify that the manifold pressure matches the specification. For electric units, measure voltage under load to prevent the breaker from tripping and ensure the heat-up stays on pace. Run a short burn-in to confirm ignition, stable flame, or element cycling, even plate temperatures, and proper grease flow. Log the results in your commercial griddle installation checklist to have proof for inspections and facilitate easy troubleshooting later.
9. Temperature Calibration and Control Settings
 If setpoints do not match actual surface temperatures, you get undercooked or overcooked product, longer ticket times, and wasted energy as staff chase temps. Verifying plate temperatures with a surface thermometer or infrared gun, and then aligning controls to the manufacturer’s specifications, ensures that each zone delivers the heat you expect.
Dialing in controls also protects the equipment. Proper calibration reduces short cycling, prevents overheating, and helps maintain even heat across the plate, which in turn extends the life of the thermostat, probe, and element or burner. Document target and actual readings by zone, noting any adjustments, and record them in your commercial griddle installation checklist so that future checks are quick and standards remain consistent across shifts.
10. Grease Management System Setup
A properly set grease drawers keep hot oil away from walking paths. Routing grease to approved containers and scheduling daily emptying and filter checks also helps you avoid drain clogs, odors, and pest issues.
This setup matters for compliance and uptime. Local codes and insurance require safe storage and disposal of cooking grease, and neglected systems are a common source of fires and failed inspections. Record container types, locations, service intervals, and cleaning steps in your commercial griddle installation checklist so every shift follows the same safe process.
11. Safety Feature Activation and Verification
The griddle’s safety systems demand immediate activation and thorough testing before any cooking operations begin. Understanding different safety feature types guarantees you’re protecting your team and equipment investment. Each system requires specific verification methods to confirm proper operation. Your systematic approach to safety verification should include:
- Temperature limit switches – Test emergency shutoffs at maximum heat settings
- Grease fire suppression – Verify automatic detection triggers and manual releases
- Gas leak detection – Check sensor responsiveness with approved testing protocols
- Electrical safety interlocks – Confirm ground fault protection activates properly
- Emergency stop controls – Test immediate power disconnection from all positions
Document each test result with timestamps and technician signatures. You’re joining a community of professionals who prioritize safety excellence, guaranteeing every shift starts with confidence in your equipment’s protective systems.
12. Initial Seasoning and Surface Preparation

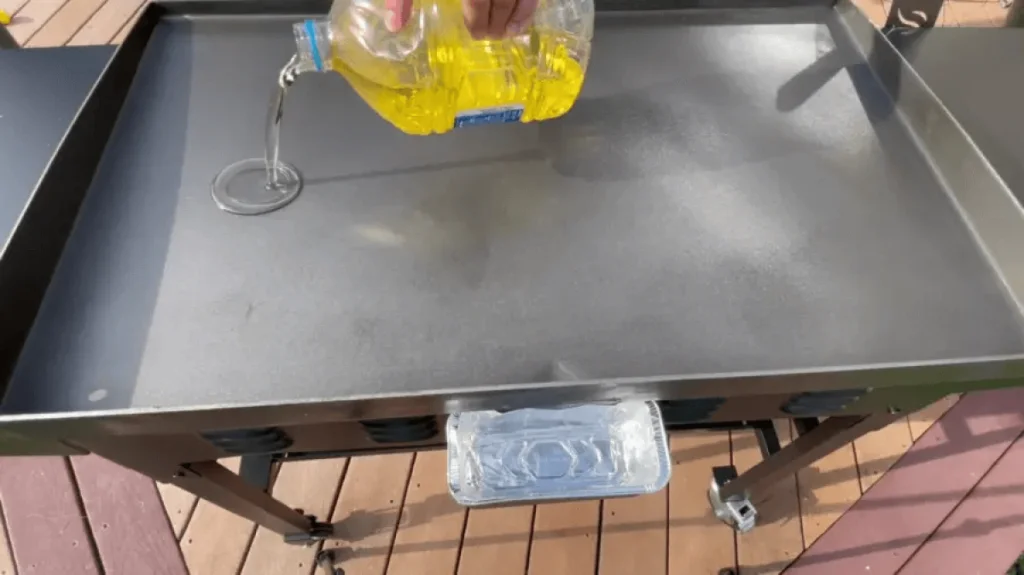
Before your commercial griddle can deliver consistent cooking results, you must complete a thorough seasoning process that creates a protective, non-stick surface layer. Start with initial cleaning using a mild detergent solution to remove manufacturing residues and protective coatings. Rinse thoroughly and dry completely before proceeding.
Surface conditioning requires applying a thin layer of high-temperature cooking oil across the entire griddle plate. Heat the surface to the manufacturer’s specifications, typically 350-400°F, allowing the oil to polymerize and form your base seasoning layer.
| Step | Temperature | Duration | Oil Application | Visual Indicator |
|---|---|---|---|---|
| Initial Clean | Room Temp | 10 mins | None | Residue-free surface |
| First Oil Layer | 350°F | 15 mins | Thin coating | Light smoke |
| Second Layer | 375°F | 15 mins | Minimal recoat | Golden tint |
| Final Layer | 400°F | 20 mins | Light touch-up | Dark patina |
| Cool Down | Gradual | 30 mins | None | Matte finish |
13. Staff Training on Operation and Controls
Effective griddle operation depends on thorough staff training that covers vital controls, safety protocols, and daily procedures. Your team’s control of familiarity has a direct impact on food quality, equipment longevity, and workplace safety. Proper operating techniques guarantee consistent results while preventing costly mistakes. Focus your training program on these fundamental elements:
- Temperature control expertise – Teach precise heat zone management and thermostat adjustment techniques
- Cleaning cycle procedures – Demonstrate proper shutdown, cleaning, and startup sequences for peak performance
- Safety protocol adherence – Establish clear guidelines for hot surface handling and emergency procedures
- Product placement strategies – Train staff on efficient cooking patterns and surface utilization methods
- Troubleshooting basics – Equip your team with knowledge to identify common operational issues quickly
Document these procedures and conduct regular refresher sessions to ensure operational excellence is maintained.
14. Maintenance Schedule and Documentation
While proper operation forms the foundation of your griddle, establishing a detailed maintenance schedule guarantees peak performance and significantly extends the equipment’s lifespan. You’ll need extensive maintenance documentation that tracks every service interval, creating accountability within your team.
| Daily Tasks | Weekly Tasks |
|---|---|
| Clean cooking surface, grease tray | Deep clean burner assemblies |
| Check gas connections, temperature controls | Calibrate thermostats, inspect seals |
| Document performance issues, unusual sounds | Review maintenance logs, schedule repairs |
Schedule optimization requires matching manufacturer recommendations with your operational intensity. High-volume kitchens demand more frequent inspections than standard operations. You’ll establish cleaning protocols that prevent grease buildup and guarantee consistent heat distribution. Document every maintenance activity, noting part replacements and performance observations. This systematic approach keeps your team aligned and your equipment reliable.
15. Final Performance Testing and Sign-Off
Once your maintenance protocols are documented, thorough performance testing validates that your commercial griddle meets operational specifications and safety standards. You’ll need to systematically verify all performance metrics against manufacturer specifications to guarantee your equipment operates within acceptable parameters.
Complete these crucial testing procedures:
- Temperature verification – Confirm surface temperatures match control settings across all zones using calibrated thermometers.
- Safety system validation – Test emergency shutoffs, gas leak detection, and ventilation interlocks function properly.
- Performance metrics assessment – Document heat-up times, temperature recovery rates, and energy consumption levels.
- Compliance standards verification – Verify all local health department and fire code requirements are met.
- Final operational sign-off – Obtain written approval from kitchen management confirming equipment meets their operational needs.
Document all test results for warranty compliance and future reference.
What Maintenance Tasks Belong In The First 90 Days Section Of The Commercial Griddle Installation Checklist?

In the first 90 days, do simple daily and weekly tasks. Each day, clean and season the plate, empty the grease drawer and trough, and inspect the gas or electrical connections and restraints for any issues. Each week, thoroughly clean the plate, wash the hood filters, check for even heat using an IR thermometer, and tighten any loose knobs or screws.
Add a few scheduled checks. Every two weeks, perform a gas leak check using a non-corrosive solution and inspect cords and plugs on electric units. Monthly, confirm the gas pressure or voltage under load and ensure the unit remains level. At 60 days, recalibrate the temperatures if they have drifted and verify that the hood captures smoke effectively during a rush. At 90 days, conduct a comprehensive preventive check of the ignition, flame, or element cycling, safety interlocks, and drain paths, and then refresh staff training on cleaning and shutdown procedures. Log everything in the commercial griddle installation checklist.
Why Should You Consider Partnering With A Stainless Steel Fabrication Service?
Working with stainless steel fabrication experts helps you build a cleaner, tougher, and more efficient cookline. They can create custom shelves, stands, splash guards, and grease guides that fit your space perfectly, reducing clutter and making cleanup faster. Seamless stainless steel surfaces are easy to sanitize and withstand heavy daily use.
These custom pieces also make your commercial griddle installation checklist easier to follow. Utility cutouts, reinforced mounting points, and removable panels enable you to route gas and power neatly and access parts for service without hassle. By aligning the fabrication with your commercial griddle installation checklist, you achieve a smoother setup and a kitchen that operates more efficiently day after day.
Conclusion: Putting the Commercial Griddle Installation Checklist to Work
With every section complete, bring it together with an explicit sign-off that your team can follow. Use your commercial griddle installation checklist to confirm readiness, then archive your notes, photos, and baseline readings so future reviews are quick and consistent. A concise handoff to operations, plus a copy of the commercial griddle installation checklist for shift leads, ensures a smooth start and a reliable path forward.

